Showing posts with label Sally Hansen. Show all posts

Saturday, May 9, 2015

Update On My Nails and Latest Arcane Lacquer Purchase 9 May 2015

Today I have an update on how my nails are recovering from the disaster I had with some nail glue and acetone nearly 2 months ago (see earlier post for more information), and also some photos of my latest purchase from Arcane Lacquer.

Firstly, here is a photo of my nails as they are today. Please excuse my ugly hands, which are partly the result of age, but also from losing a lot of weight over the last couple of years, and of course there is no way to get rid of the excess skin.  If anyone knows of a way of improving them I'd be very grateful for your advice, because I hate looking at them as they are now.  I slather them in hand cream throughout the day but, although they feel nice and soft, they look horribly wrinkly and OLD!


As you can see, my nails are coming along pretty well.  The nails on my right thumb and left pinky are only just growing past the nail base, as are the nails on both of my middle fingers.  Also, many of them are still lifted off the nail bed, the most obvious of which are my two index fingers, but I'm hoping that they will recover as they get stronger and healthier.  Most of the horrible brown, flaking tips caused by my chemotherapy last year are finally growing out, and the nails behind them are a lovely, healthy pink. My cuticles are looking so much better, and so are my nails, so I'm starting to feel a lot better about the way things are going. 

So, if I can keep them safe for another week or two, it looks like I might be able to start painting them again very soon.  I'm waiting for a new strengthener I ordered to arrive (Australia Post up to its usual standard), and this one is supposed to actually strengthen them immediately as well as treating them, so it should be amazing.  More on that when it arrives and I've given it a try.  In the meantime, I'm using Sally Hansen Miracle Cure on them every other day, and continuing to use my Jojoba Oil, Revitanail Keratin Strengthening Serum and Nourishing Oil, and Revitanail Hand & Nail Cream throughout the day, especially after washing my hands.

I have so many new nail polishes in my stash that I am dying to try out, including the two beautiful Arcane Lacquer polishes below.  This are another Indie Polish brand that I am very quickly becoming addicted to.

https://www.etsy.com/au/shop/ArcaneLacquer?ref=l2-shopheader-name 

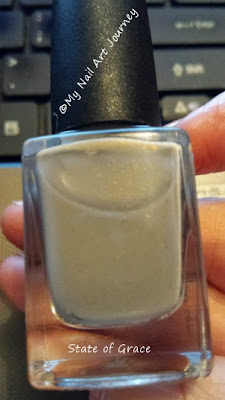
The one on the left is "Glorious Nightmare" and the one on the right is "State of Grace".  It was soooooo hard to get the true effect of these polishes, although the "Glorious Nightmare" photo is pretty close to the mark.  I have two close-ups of them below, and the one of "State Of Grace" shows some of the shimmer and micro-glitter which you can't see in the photo above, but the actual colour is a bit darker. 

https://www.etsy.com/au/listing/204282672/glorious-nightmare-halloween-duo-arcane?ref=shop_home_active_21   https://www.etsy.com/au/listing/177259044/state-of-grace-soft-pulses-collection?ref=shop_home_feat_2

"State of Grace" is described as a mushroom/taupe creme with a strong gold shimmer and flecks of orange and green, along with gold flakies, although I would describe it as grey. You really have to see this in real life to appreciate its true beauty. "Glorious Nightmare" is described as a deep purple jelly with berry pink, lemon and purple micro glitters. They both are absolutely beautiful, and I can't wait to try them out, which I'll be able to do very soon, God willing.

That's all I have for you today, but I hope to have more very soon when some of my purchases that I'm waiting on arrive.  I hope you will come back often to see what I have to show you, and you can follow me if you wish to by going to the top right-hand side of my page.

Have a wonderful Mother's Day tomorrow, and may God bless you.  For anyone going through treatment for breast cancer, my prayers are with you, and I hope that you come out the other end OK.  My mantra now is "I'M A BREAST CANCER SURVIVOR, AND STAYING ONE".  I actually found a badge with that written on it online, and I'm going to start wearing it everywhere.

Hugs

Christine

I was not paid in any way, shape or form for showing you these polishes.
 I bought them with my own money,
and my opinions are given freely and without bias.

Saturday, March 28, 2015

Absolute Disaster on 27 March 2015 - DON'T BUY THIS NAIL GLUE!!!!!!

Yesterday I had an absolute disaster with 3 of my nails which I was trying to patch, using a different nail glue to the one I usually use, and here is how my nails and fingers look today!


As a result of this, I want to advise everyone NOT TO BUY THE NAIL GLUE shown below:


and here's the full story of what happened.

After taking off last week's manicure and the patches I had on three of my nails, I still couldn't cut my nails back because they were broken a long way down the actual nail, and not only on the tip section.  So, I set out to put patches on them again before I put on this week's mani.  I had run out of the glue I had been using, which came with the Manicare Nail Repair Kit I bought months ago, so I decided to use the nail glue shown above, which I had bought to use to attach artificial nail swabs to my nail polish bottle lids before I put them up on the shelves.  It said "Nail Glue", so I presumed it would be safe to use, and I had to make a tiny hole with a sharp needle in the top, so there should have only been a small drop of glue on the index nail on my left hand (the one with breaks on both sides of the nail) when I put it on.  However, that is not what happened.  It spread all over my nail, and onto two of my fingers, and then dried instantly.  My fingers were stuck together, but I managed to get them apart, and managed to finish that patch.

I then spent half an hour trying to get the glue off my fingers with acetone, and still didn't manage to get it all off, but I wanted to go ahead and patch the other two nails that needed repairing, so I decided to finish trying to get it off after I had finished the patches.  I had read during the week that micropore tape from the pharmacy is a good alternative to tea bags to use for patches, so I applied some over the splits on the middle finger on my left hand and the thumb on my right hand.  I filed off the excess bit of the fibreglass tape that I used with the nail glue patch, and smoothed off the surface of the glue.  

Next, I added two coats of Sally Hansen "Hard As Nails" original formula nail hardener to all my nails, waiting for each coat to dry before adding the next one.  I then added one coat of Jordana "Mellow Yellow" to all my nails except for my ring fingers, and one coat of Sinful Colors "White On White" to my ring finger nails.  I was planning to do a gold and green water marble manicure for the Cricket World Cup Final on Sunday, 29 March 2015, in which Australia are playing.  However, when the polish finally dried on the patched nails, I noticed that the polish was really rough on the ones I used the micropore tape on.  So, I decided to remove the micropore patches and do them the same way as the one with the glue, and that's when disaster struck.

The micropore tape nails were easy to clean and remove the tape, but when I tried to do the patch on the first nail, glue went all over my fingers again.  I then tried to add some acetone to a cotton swab to try to get it off, but the acetone went all over the nails on my right hand, and I just burst into tears.  Then I tried to use the acetone to remove the glue from my fingers once again, and most of it just wouldn't shift.  I used the foil method with 100% acetone on the two nails with the glue on, and after 15 minutes they still hadn't shifted, so I added more to them, left the remover on for 15 minutes, and the glue hadn't even budged.  I tried again, and again, and finally managed to get the patch piece off, but the glue underneath still wasn't going to budge.  

Meanwhile, all this time, my finger and nails was burning because of the acetone, so I switched to an acetone-based polish remover, and after about 2 hours I finally managed to remove most of the glue, but in the process the nail on my index finger broke right off, and the other break got worse.  That's when I really gave up, and decided to cut all the broken nails off as carefully as I could, and filed the rest of my nails back a lot so they didn't look ridiculous.  I was really crying my heart out at this stage, because I was watching 9 months of careful nurturing and beautiful manicures going out the window, and my nails looked worse than they did when I first started my blog after the chemotherapy damage.  One of the nails even started bleeding, and you can see how badly the tips of my fingers were damaged by the glue and the acetone.


So, now I won't be able to do anything but nourish, strengthen and pamper my nails and hands for weeks until they start to recover, and start from scratch again.  I am absolutely heart-broken, and feeling extremely discouraged.  I just wish I could find some glue like the one I got with the Manicare Nail Repair Kit to use with the tea bag patches, but I think the only way I'm going to be able to is to buy a whole new kit, even though I've still got half the fibreglass strips left, and the emery board will last for a long time yet.  

This was a horrible lesson to learn, but I will never put nail glue made for false nails near my nails again, especially the one I tried.  After more than three whole hours just to get the two patches off, plus the time taken to put the base coat and polish on, and then take it off, and still picking glue off my fingers, I guess all I can do is start treating my nails and hands with kid gloves, and use everything in my arsenal to repair the damage.  My first port of call was, of course, my Jojoba Oil, but I have other things I can use, so my next few posts will most likely be updates on how my nails are going and how the different products that I use perform. 

I hope you won't give up on me, and that you will come back again to see how things are going.  If I find anything interesting on my travels around the internet I'll let you know, and will also keep you informed about any new polishes I get while I'm waiting to start polishing my nails again.

Bye for now, and I hope to be back real soon.  Have a wonderful day, and may God bless you.

Hugs

Christine

(Please check out my other blog below, too.)

Words of Life and Hope
http://wordsoflifeandhope.blogspot.com.au/

Tuesday, March 24, 2015

My First Water Marble Manicure - 24 March 2015

Yesterday I did my first water marble manicure, and I'm pretty pleased with the way it turned out. 


Picture on left was taken inside under artificial light, and the one on the right was taken in the shade.
 
Please forgive the rough skin around my finger tips and cuticles, but my nails have had a pretty tough time over the last few days.  My index finger and my middle finger on my left hand, and my thumb on my right hand, all have patches on them.  They broke half-way down my nails - they have all pulled away from the nail bed down the side of the nails because of the chemotherapy damage, and they are still very thin and fragile there.  I still don't know whether this damage will be permanent, or if they will grow back onto the nail bed as the new nail growth comes through.  Only time will tell!  I went out today and bought some Revitanail "Strengthener", "Keratin Strengthening Serum", Nourishing Oil" and "Hand & Nail Cream".  They are on special at Terry White's Pharmacies, 3 items for the price of 2, this week (in Australia), and I'm going to start using them all as often as possible.  I'm afraid I haven't been following my own advice lately because I've been so busy, and have also been feeling really depressed and not at all motivated, so I have to start practicing what I preach again and try to get things back on track.

Now, on to my water marble manicure.  I started with 2 coats of Sally Hansen "Hard As Nails" strengthener because all my nails are so fragile, and I'm hoping this will help to keep them from breaking.  I got 6 bottles of it REALLY cheap before Christmas on eBay, but forgot I had it.  When my nails broke (after I'd stopped crying - literally), I started thinking about what strengthening base coats I had that I could use, and I remembered I had this.  So, God willing, I won't have any more breaks for a while.

I then added two coats of OPI "Alpine Snow" white cream polish to all my nails. I don't really like this polish because I need three coats to get a smooth finish, but because I was actually planning to do a plastic wrap marble manicure (tutorial here http://polishandpearls.com/watercolor-nails/ and elsewhere online), I just left it at two coats.  However, I couldn't get this manicure style to work with the polishes I wanted to use, so I decided to try an actual water marble instead (tutorial here http://www.beautybay.com/EssentialBeauty/Articles/watermarblenailstutorial and in many other places online). 

I then smeared Vaseline around all my nails and part-way up my fingers to make cleaning up a lot easier, because water marbling is very messy.  I had to be careful not to get any of the Vaseline on the actual nails, because it would have stopped the nail polish from going onto the nails.

Next, I filled my bowl with tepid water straight from the tap, and added drops of OPI "Alpine Snow" (white), Face of Australia Pastels "Boys 'N' Berries" (blue), OPI "Mod About You" (pale pink) and OPI "Planks A Lot" (lilac) (in this order).  I did this three times for each design (twelve drops in all), and then used a toothpick to make my design, following the above tutorial as a guide.  All the polishes spread over the water really well, which was great. I used a small glass bowl because I wanted to do all my nails at the same time, instead of individually or in pairs, which is the usual way it is done, because I was so frustrated that the other design hadn't worked and wanted to get it over and done with.  My design was a random one, instead of any particular design, in which I just swirled the colours around and through each other until I was happy with the distribution of the colours.  Then I just dipped all five fingers of my left hand in the bowl at once, and repeated all this with the other hand.

I finished off my manicure with one coat of Revlon "Quick Dry Top Coat", which gave me a beautiful, glossy finish. I am rather pleased with the end result, and really love the way the colour combination worked out.  Of course, I still have a lot to learn about this technique, but with all the advice and tutorials available on YouTube, and numerous blogs and websites online, I should be able to have a lot of fun trying out new designs, and a multitude of colour combinations, in the future.  It really is quite easy to do, I found, and the mess was easy to clean up because I had used the Vaseline around my nails and fingers.  Next time I'm going to try using sticky tape around my nails and fingers, and see how that goes.

Thank you so much for visiting, and I hope you'll come back often to see what I have to share with you.  If you so wish, you can follow me by filling in one of the boxes at the top right-hand side of the page, and I'd love you to share it with your nail-art friends.  Now I'm off to put some cuticle oil on my cuticles and lots of hand-cream on my hands.  I couldn't believe how dry they were until I took the  photos.  My new phone has a really good camera, and it's picking up flaws in my manicures, and every little bit of damage to my nails, cuticles and hands, which don't show up when you just look at them day to day.  So, I've got lots of work to do to repair all the damage, as if I didn't have enough problems with my nails already.  Oh, well, that's my own fault, I guess, for letting things slide.

Have a wonderful day, and may God bless you!

Hugs

Christine

(Please check out my other blog below, too.)

Words of Life and Hope
http://wordsoflifeandhope.blogspot.com.au/

Wednesday, March 11, 2015

Caring For Your Nails Before, During and After Chemotherapy

I have just realised that, despite the main aim of my blog being to help others who are going through chemotherapy, I haven't put my nail care advice guide, that I wrote just before I started my blog, on the site.  Silly me!!!!!  So, here it is, and I hope it can help keep someone going through chemotherapy from experiencing what I went through with my nails.  Firstly, I'd like to show you the damage done to my nails by the chemotherapy.


Caring For Your Nails Before, During and After Chemotherapy

Before I started chemotherapy for breast cancer, I was told by my oncologist, and the breast-care nurse, to paint my nails with dark nail polish to protect my nails from the sun's UV rays, and to hide any damage that might occur.  Despite using nail polish, my nails were still horribly damaged - they went a horrible brown colour, started to flake and peel, and even started to come away from the nail bed.  I went searching for information to help me repair my nails, and also ways to care for them once they were looking good again.  No one told me any of this information before I started chemotherapy, but if they had, I possibly may not have had any of the problems with my nails that I did.

So, I decided I wanted to try to help prevent all the beautiful women (and men) going through chemotherapy from going through the same experience I did.  Here are some things I WAS NOT TOLD that you really need to know BEFORE you start chemotherapy.

1.  Prevention is better than a cure, of course, so be prepared and start early. As soon as you know that you are going to have chemotherapy, start using the nail and hand routine below, and do it every day without fail.  Hopefully, this may stop you from getting the severe damage I did.  I can't promise it will prevent all the damage, but it should help a lot, and should definitely help to keep your nails from drying out.

2.  Buy yourself the best CUTICLE OIL/NOURISHING SERUM you can afford.  Revitanail and Sally Hansen make some really great ones that nourish, strengthen and protect your nails, but there are other brands out there too.  They are readily available from pharmacies, department stores, beauty shops, Priceline stores and, of course, online.
     
     I have recently discovered that PURE JOJOBA OIL is the best thing you can use on your hands and nails, so I am using that now, too.  It is available at health food shops, Priceline and Chemist Warehouse, but it is a lot less expensive online, and there are many companies that sell it.  Check out eBay, or just Google it and you will be amazed by the other uses it has, too.  It's also odourless.  AMAZING STUFF!!!  

    I would suggest you use both the cuticle oil and Jojoba Oil to give you even more protection from damage.  Massage one of them into you nails and cuticles every time you wash your hands if you can, but at least twice a day, morning and night.

3.  ALWAYS use a GOOD QUALITY BASE COAT on your nails before applying your nail polish, because today's nail polishes are made to adhere to the base coat, not your nails.  It will help stop your nails from being stained by the nail polishes you use, too.  You can also get strengthening and nourishing base coats - even more protection and nourishment for your nails.  Availability is the same as for the cuticle oils. 

4.  Apply as many coats of nail polish as you need to get the coverage on your nail you want, waiting for each coat to dry before applying the next coat.  Usually two coats are enough, but some polishes require three.  Apply thin coats, because the thicker the coat the longer it will take to dry.  They are available from the same places as mentioned above.

5.  If you want your nail polish to last more than just a few days, you should use a good quality TOP COAT to stop it from chipping and getting damaged.  There are some great top coats available, from the companies I have already mentioned, and of course from the same places.  Reapply your top coat every other day to make your polish last longer.

6.  Finish off by applying a good quality HAND AND NAIL CREAM.  Massage a generous amount into your hands and nails at least twice a day, but more often if you are washing your hands a lot, because washing dries out both your hands and nails.

7.  Always try to use gloves when you are washing the dishes, gardening or cleaning around the house, because they, too, will help to prevent your nails from getting damaged.

8.  Always use an ACETONE-FREE POLISH REMOVER, because acetone dries your nails out, and is very harsh on your cuticles.  There are some great conditioning ones for different skin types. They are available from the same places as the other nail care products.

9.  Every time you remove your nail polish, massage your cuticle oil/nourishing serum into your nails and cuticles several times, over a couple of hours, before applying your next nail polish.  This gives the oil/serum a better chance of getting right into your nails and cuticles, and will really make a difference to how strong and healthy they are.

10. Don't use a metal nail file or emery board on your nails, because they will only cause even more damage.  Buy a good quality Czech crystal/glass nail file , which is a lot finer and so much kinder to your nails.  Manicare sell a great one which I use.  Don't be tempted to buy a cheap Chinese one, because the quality is inferior and could cause damage.

11. There are ECO-FRIENDLY VERSIONS available for all the products mentioned above if you are concerned about the environment or have allergies.  These are usually advertised as being 3-free or 5-free, which means they don't contain the nasty chemicals most of the other polishes do.  Just Google for more information and where to purchase them.

12. Lastly, one of the most important reasons for putting nail polish on your nails is that it not only helps to protect your nails, but THEY WILL LOOK GREAT, too, and that will make you feel better about yourself, and that has to be a good thing.  When you see the range of nail polish and nail art products available, even scented ones, you will be amazed at how attractive you can make them, it will really lift your spirits, and may even help to take your mind off what you are going through, which is what happened with me.

If this information helps to keep just one person from getting the damage chemotherapy did to my nails I will be happy.  Seeing my nails the way they were was so depressing, and that was the last thing I needed, and the last thing YOU will need while you are going through your chemotherapy treatment, and afterwards, during your recovery period.  If you already have damage, it's never too late to start looking after them.  It really is worth the effort.

Here's a photo taken on 25th February 2015, less than five months after the last photo was taken, showing the improvement which following the above regime has made to my nails and cuticles.  There is still some damage, for example the lifting from the nail bed, but I'm hoping that will improve with time, God willing.  Most of this improvement has come since starting to use the pure Jojoba Oil mentioned earlier.  Please do give this amazing essential oil a try.  It's an absolute miracle worker, and makes your hands and nails feel great, too.


I would like to wish you all the best for your journey through your cancer treatment, and hope that you reach the other end with a good outcome.  Look good and you'll feel better!

© Christine Chipman 2014

Tuesday, March 3, 2015

My Manicure for 1 March 2015

Today I have a full "skittle" manicure to show you, which happened by accident, because I only intended to put the pink polish on 3 nails on each hand, but I was watching TV while I was doing my mani, and before I knew what I'd done, I had pink polish on all five fingers on my left hand.  So, I just went ahead and did my other hand, but then added other polishes to my thumbs, index and pinky nails, mainly because I didn't like the color or finish of the pink nail polish on my nails, but also because I wanted to feature the Moonstone polish "Sample 10" on my middle fingers.

Photo taken in shade.

Products used:  Revlon Quick Dry Base and Top Coats, OPI "Pink-ing Of You" , Sally Hansen Hard As Nails Xtreme Wear "Golden-I", Moonstone "Sample 10", Savvy "High Voltage", L.A. Colors Color Craze "Tinsel", and China Glaze "Bridezilla".

I started with one coat of base coat to every nail, then one coat of OPI "Pink-ing Of You" to every nail.  It was at this stage I had realised that I was supposed to be doing a "skittlette" manicure, with a feature nail and another nail with a different colour on it. (Big BOO BOO that!!!)  I then added another coat of "Pink-ing Of You" to my thumb, index and pinky nails.  However, I still did not have full coverage, so I added another coat, but still the coverage was patchy.  The polish is very thin, and not easy to work with.  It was very hard to stop it from looking patchy no matter how careful I was. That was when I decided to do a full "skittle" mani to cover up the patchiness by adding three different glitters/toppers to the pink nails, hence the "skittle" instead of the "skittlette" manicure.

Next, I added two coats of "Sally Hansen Hard As Nails Xtreme Wear "Golden-I" to my ring fingers.  This polish is sooooooo beautiful, and I almost got full cover with just one coat, but used two for this mani, and because it is over a coat of pink, the effect is gorgeous, with just a tinge of pink showing through.  The finish is beautifully smooth and shimmery, and it went on like a dream. I will definitely be using this polish a lot in the future when I want a golden nail, or for stencils and/or nail art, and will have to go out and find another bottle before they decide to take it off the market (I hope they haven't already), because the bottle is only 11.8ml, so it probably will not last very long.

Then I added two coats of Moonstone "Sample 10" to my middle fingers.  This is a colour that, unfortunately, is no longer available, and Caitlin (the owner and maker of Moonstone polish) told me she has lost the formula, so she can't make any more.  When I first received this polish in the mail, I was so blown away by it that I went straight back to the site and bought the last bottle Caitlin had, and have since bought several more.  It is a beautiful, very, very pale blue crelly, loaded with heaps of gold and holographic micro-glitter; gold, hot pink and pink tiny, round glitter; small white square glitter; and larger pink hexagonal glitter.  It was wonderful to work with, and looked gorgeous over the one coat of pink underneath, even with just one coat, but I wanted to get the full crelly effect, so I used two coats for this manicure.  It went on smoothly, and two coats was more than enough to achieve the effect I wanted.  It looks like milky jelly with layers and layers of different glitters (see the close-up below).

My next job was to try to cover up the patchy pink polish, so I went searching through my glitter polishes and toppers and found three that completely transformed the OPI "Pink-ing Of You" to something beautiful.

The first one, which I added to my thumb nails, was Savvy "High Voltage".  It is an amazing glitter polish, loaded with gold and holographic micro-glitter (and I mean LOADED), as well as heaps of small pink and gold hexagonal glitter.  It can be used on its own, with two coats giving good coverage, but I just wanted to add a little extra to cover up the flaws in the pink polish underneath, so only used the one coat.  It was lovely to work with, and no fishing around in the bottle was needed to find the glitter. It was like adding a light smear of gold leaf with flashes of pink and gold glitter, and the shimmer effect is just beautiful.

The second glitter/topper polish I used was L.A. Colors Color Craze "Tinsel", which I added to my pinky fingers.  It is a pink jelly polish, with lots of pink and holographic micro-glitter, and larger pink and holographic hexagonal glitters.  Just one coat smothered the pink with a slightly richer, pink jelly layer that sparkles like diamonds.  It's just gorgeous in real life.

The last glitter I used is a sheer, pale pink polish with lots of holographic shimmer from China Glaze.  It's called "Bridezilla", and is simply beautiful.  It can be used on its own by using two or three coats, but even then it is very sheer, so I prefer to use it as a pink shimmer topper, and the effect is stunning.  This would work over almost any light or dark colour, and I can't wait to try it over black one day (SIGH!).

Overall, what could have been a disaster, because of the bad performance of the OPI "Pink-ing Of You", turned out to be a lovely skittle manicure, IMVHO.  I'm really happy with the result, and here are some pictures for you.
 
 
Both photos taken inside.

   
First photo taken in shade, second taken in sun.

  
The first photo is a close-up of Moonstone "Sample 10", the second one of the whole mani in the sun.

As a follow-up to last week's mani, by the time I took my polish off yesterday, 6 days from when I put it on, there was hardly any wear anywhere except the tips, which had only worn because I am constantly typing on my computer.  It left no stains on my nails, and came off very easily.  I am just so thrilled with all the Superficially Colorful polishes I have tried so far, and I can't wait to try another one from the "Remants Of Winter Collection".
 
Thank you for visiting my blog, and I hope you'll come back often to see what I have to share with you.  I have no idea what I'll have to show you next, but I will try to make it as interesting as possible.

God bless you, and have a wonderful day.

Hugs

Christine

(Please check out my other blog below, too.)

Words of Life and Hope
http://wordsoflifeandhope.blogspot.com.au/

P.S. All polishes mentioned in this blog were purchased by me, and I was not paid in any way for my reviews.

Wednesday, January 28, 2015

Manicure for 26 January 2015 - Australia Day!

It was Australia Day on Monday, so I decided to do a red, white and blue manicure with Australian Flags on my middle fingers. Sorry it doesn't show very clearly in the photo,


I started with one coat of OPI Natural Nail Base Coat.  I then painted my middle finger with three coats of Sinful Colors Snow Me White. This colour was not easy to work with, and even with the three coats, I wasn't really happy with the coverage but, because I was going to put a transfer on those fingers, I decided to leave it on.
 .
Next, I painted my thumb and pinky nails with 3 coats of MUD Deep Blue Sea.  I found this polish to be very, very thin, and even with 3 coats it was still very patchy, so I decided to cover it with glitter (details below).  I followed this with 2 coats of Sally Hansen Lacquer Shine Luminous, which I can honestly say I have fallen in love with, to my index and ring fingers.  It went on like a dream, and if I'd been putting anything else on the nail I could have just used one coat, but decided to do 2 because I wanted it to look great!  The colour is so rich, and one of the most beautiful reds I've come across so far in my nail art journey.  I know I will be using this again and again, if I can continue to get it once my bottle runs out.  I'll definitely be keeping an eye out for any on sale.

Now to the glitter, Avon Opal, which I'm absolutely drooling over.  The photo doesn't do it credit, because it is the most amazing clear-based iridescent glitter, which really looks like you have placed shards of opal all over your nail.  One coat was all I needed to get this much cover, and the glitter is right through the polish and hadn't sunk at all, so I didn't have to go fishing for it.  The finish was a bit rough, but a good thick coat of top coat soon fixed that. I think I'll be buying some more of this next time it's on special at Avon, just in case they take it off the market.  I might even buy two bottles, because I think I'll be using this one a lot, it is just sooooooo beautiful!

I then covered all my nails with one coat of OPI Top Coat, which is still my top coat of choice.  Then I placed a transfer of the Australian Flag in the shape of a heart to each of my middle nails.  This was my first time using transfers, and I actually found these easier to work with than stickers, because stickers have got a habit of grabbing on before I have them exactly where I want them.  They are just so sticky, but I guess I'll get used to them after I've used them more.  I have lots of both transfers and stickers, so will be using these a lot in the future.  I then applied one more coat of OPI Top Coat to my middle fingers over the transfers, which actually caused a bit of a disaster.  On my left hand, I was a little heavy-handed with the brush when applying the top coat, and the colour smudged.  On my right hand, the one in the picture, of course, I just sort of waved the brush over it with a rather thick glob of polish on the brush, and it turned out fine.  So, another lesson learned through trial and error.  And, you know how the saying goes, one should learn something new every day or it has been wasted.  I've certainly not been wasting my manicure days, I can assure you, because I learn something new each time I do a new manicure.

I have been inundated with new polishes this week, but haven't yet got any photos of them, so can't show them to you yet, but I will as soon as possible.  They all turned up at the same time yesterday (Tuesday) - some were brand new Indies (YAY!!! Finally got some!), some were mainstreams I'd ordered online from BuyInvite last month, and the rest were from someone destashing, which only cost me postage.  I can't thank her enough, because she ended up sending me 13 polishes, and I was only expecting 6 or 7.  If she reads this, she'll know who I'm talking about, so thank you so much, Brianna.

I finally got my Konad stamper yesterday, too (the postman was overloaded with packages for me - 6 all-up for the day), so I might try experimenting with some stamping again and see how it works.  I hope it does, because otherwise I'm giving up on stamping forever.  There are so many other wonderful things I can do with my nail without resorting to stamping, so it really won't be a loss.  I love the look, though, and I've got some wonderful stamping plates, so I'm going to give it one more try.

Well, that's it from me for another week.  I hope you'll come back and visit often, or even follow me through G+ or email, because I've finally worked some more of the gadgets out for blogging on Blogger, so more learning as I go.  I'll work it all out eventually, and hopefully my hubby and I will be able to get some better results with our photos, too.  We're still trying to figure out the best place in the house, or outside, to take them, and what to use as a background.

So, God bless you, and have a wonderful week!

Hugs

Christine

(Please check out my other blog below, too.)

Words of Life and Hope
http://wordsoflifeandhope.blogspot.com.au/

Monday, January 12, 2015

My Manicure For 9 January 2015

Firstly, my manicure from last week lasted 7 days with very little damage at all.  I really am amazed at the way my OPI Base Coat and Top Coat perform for me.  They keep my mani so crisp and bright, and unless I actually hit my nail on something, I get very little wear at all.  I'll be looking out for larger sizes of these two products for sure, especially the top coat, as I use it every second day.

Nothing very exciting this week, but I thought I should still show you what I did.  The products I used were:  Sally Hansen Nail Rehab Strengthener, Sally Hansen Salon Manicure Base Coat, Sally Hansen Complete Salon Manicure Fruitti Petutie, Savvy by DB Confetti, Calvin Klein Hallucinate, and Sally Hansen Diamond Strength Diamond Shine Base and Top Coat.  I used the Sally Hansen base and top coats because I was using Sally Hansen nail polish, and they should work well together.  We will have to wait and see. Also, I still am struggling with cleaning up after I apply my nail polish.  I've got a new clean-up pen, and am still working out the best way to use it.  So please forgive the rough finish around the base of my nails.


I started with one coat of Sally Hansen Nail Rehab Strengthener because my nails haven't been doing very well just lately.  The damaged section is getting very dry, brittle and fragile, and my middle nail on my right hand is still being held together with a "tea bag" patch.  Just after taking this photo today (3rd day of my mani) I knocked my thumb nail on my left hand on the bench and took a chunk out of the tip of it.  I wanted to cry, becauses that nail was just starting to recover from a previous break and was looking pretty good.  I've filed it back a bit with my nail polish still on, and added another coat of top coat to it so that, hopefully, it will last until my next manicure in a few days.

Next, I applied one coat of Sally Hansen Salon Manicure Base Coat. I haven't tried this base coat before, so it will be interesting to see how it performs. Then I applied three coats of Sally Hansen Fruitti Patutie to each nail, followed by one coat of Savvy Confetti glitter to my ring fingers.  I did dab a few more bits of glitter in a couple of places to give it better coverage, but I didn't really need to.  There is so much glitter in this bottle of polish it is unbelievable.  It has heaps of small white, mid pink and dark hot-pink hexagonal glitter, with teeny, tiny little bits of the same colours filling just about every gap in between.  The base is clear, but you wouldn't think so when you look into the bottle.  It is just gorgeous, and could be worn with all sorts of colours, or perhaps on its own if you used two or three coats.

I wanted to add a little more interest to the look, so I finished off my manicure with one coat of Calvin Klein Hallucinate, which is a beautiful holographic glitter in a milky, clear base. I love this polish, and have used it a couple of times in the past because it gives me just the right amount of shimmer on my nails over any colour I've tried it with.  This is another polish I'm going to be keeping an eye out for while I'm looking around online. I'm not sure where, or even if, I can get it anywhere in stores in Australia, so I'll probably have to go to ebay for it, like I did last time.

I know it isn't a very exciting design, but I had a very busy week, so I needed something easy and quick to do, and I wanted it to be pink because of the pink cricket test match that was played in Sydney last week, and Jane McGrath Day in particular, when people are asked to donate funds to the McGrath Foundation.  This foundation, for those who don't know, was the brainchild of Jane McGrath, the wife of one of Australia's best ever cricketers, Glenn McGrath, when she was diagnosed with breast cancer for the second time, and then with secondary breast cancer, which turned out to be terminal.  Jane realised that there were too many women living in regional and country areas of Australia who have to travel many, many hours to get to a hospital where they can access treatment for breast cancer, and possibly have to stay for days at a time, far away from their families when they really need them close.  She thought that, if there were enough breast care nurses in Australia, they could travel to the patients instead, and take the treatment to them, and also be there to support them, and their families, through their breast cancer journeys, whether the outcomes are good or bad.  After she passed away, the running of the Foundation was taken over by her best friend, Tracey Bevan, and Glenn, and it is so wonderful to see her dream coming to fruition.

It was the 10th anniversary of the Foundation this year, and 7 years since Jane passed away, but every year the test match played in Sydney is taken over by the colour pink - and the number of people who turned out in pink on Jane McGrath Day this year was astounding.  In fact, if you didn't have something pink on you stood out like a sore thumb, and you would really would have felt out of place.  Sponsor's logos turned pink, the stumps on the pitch were bright pink, the players wore pink caps, and had pink emblems on their clothing, and even the commentators for the match wore pink - one even had a complete suit, shirt and tie on. (They were all men but one, but the way.) Talk about commitment to the cause!!!!

This is an amazing charity and, after just 10 years, the Foundation now funds 101 breast cancer nurses throughout Australia, (and there should be more after the fundraising during this match), and their aim is to make it possible for every woman diagnosed with breast cancer, no matter where she lives in Australia, to have access to a nurse, and they believe that 200 nurses should be able to achieve that.  So, God willing, that won't be too far down the track.  It takes over $AU300,000 to fund one nurse for 3 years, and they won't take on a new nurse unless they have the funds to commit to that, so you can see what a big achievement this has been, and what a long road they have ahead of them. If you get the chance to donate to the Foundation, please do so.  I know how important the breast care nurses at the hospital were to me last year when I was going through my treatment, and they do an amazing job looking after us, but don't often get the recognition they should.  So, thank you from the bottom of my heart to the nurses who looked after me last year when things were so tough.  You wonderful nurses all deserve medals, and are worth more than words can express!

So, that's me for this week.  Please let me know if you like my nail art designs, or not, and I'd love you all to leave comments to encourage me if you could.  I've finally found the widget that allows people to subscribe to my feed and follow my posts, so I hope you will join and come back often to see what I've been doing with my nails, or what new goodies I've found to share with you.  I scored some amazing new polishes this week, at bargain prices, so I might get my hubby to take some photos of them and share them with you in a day or two.

God bless you, and have a wonderful day.

Hugs

Christine

(Please check out my other blog below, too.)

Words of Life and Hope
http://wordsoflifeandhope.blogspot.com.au/

Monday, December 15, 2014

Another Christmas Manicure 14 December 2014

Sorry it's been a while (12 days, I see), but I had another disaster this week.

My last manicure lasted 9 whole days with virtually no damage at all.  I was amazed, but I didn't want to bore you with more photos of it. However, I stuffed up royally with my manicure for this week first time around, so I had to take it all off and start again, after I had slept on it and worked out what I had done wrong.

So, today I have a Christmas-themed skittle manicure (with each nail completely different).  Here's the best photo I could get of it - although it still doesn't really do it justice,  it's pretty close.  I love the colours of all the polishes I used, and will certainly be using them again.


I started with 1 coat of Sally Hansen Salon Manicure Base Coat.  I then added 2 coats of Colours by TBN "Dancing In The Forest" on my pinkies, 3 coats of Revlon Brilliant Strength "Hypnotize" on my ring fingers (although 2 coats would probably have been enough), 3 coats of OPI "Alpine Snow" on my middle fingers and thumbs, and 2 coats of ulta3 "scarlet" on my index fingers. I found the OPI "Alpine Snow" rather hard to work with and, if I hadn't been adding glitter and stripes to the nails I used it on, I would have had to add another coat to get a smooth finish.  The other polishes were all really easy to work with, and I only added the third coat on the gold nail to add intensity to the colour.  This is a gold that I will be using a lot, I'm sure, because it is just so easy to use, and looks so amazing.  I think it would be great for stamping and/or water marble manicures, too.

Once my polishes had all dried, I placed strips of masking tape and striping tape on my thumbs. I then added one coat of ulta3 "scarlet" over the nail, quickly removing the tapes before the polish dried.  I'm afraid I wasn't very happy with the way the stripes turned out, because there were a few spots where I obviously hadn't pressed the tape down firmly enough, especially on the edges of my nails.  I discovered last night, after I had finished it, a tip suggesting that I use a coat of top coat on my nail before doing the striping, and I'll try that next time. However, as a first time striping job (where I painted over them instead of using them as the stripes), I am reasonably happy with it.   I then added 2 coats of KBShimmer "Kringle All The Way" to my ring fingers, and 2 coats of ulta3 "disco fever" to my index fingers.  I had to fish around for some large glitter with the KBShimmer, but there is heaps of different-sized glitter in the bottle (red, green and silver in different sizes, and tiny holographic glitter throughout), so it wasn't hard to get some large ones.  The ulta3 red glitter was really easy to use, and also has plenty of glitter.

Finally, I applied 1 coat of Seche Vite Dry Fast Top Coat (Yay! I finally got some!) to each nail, and I'm thrilled to bits with the finish it has given to my nails.  It covered all the glitter beautifully, and dried my manicure so quickly I couldn't believe it.  I will be interested to see how long my manicure lasts with this as my top coat.  I'll be adding another coat, as usual, every other day, and will let you know next time how well it goes.

The damage on my nails is still growing out, and I am nursing another break on my right thumb, but each week there is less of the horrible, dark-brown, fragile, flaking area on my tips left, and more of the lovely pink new growth at the base of my nails.  I am just filing a small amount off each week before I do my new manicure, and my nails are definitely getting a lot stronger each week since I started using the Jojoba oil at least twice a day. They seem to be growing faster, too, which is fantastic.  I'm also using Swisse "Hand Skin Nails" tablets, and I'm sure they have helped, too.

I've been having trouble finding a good, natural cuticle oil that uses Jojoba oil as a base that is a reasonable price, but have decided to make my own after I have used up all the treatments I've already bought.  I'm also having trouble finding a good, hydrating hand cream, but I've found some great recipes online, so I've decided to source all the products I need to make my own, and have also found a recipe for an exfoliating sugar hand scrub, and will be making some of that this week once I find some nice jars to put it in.

I'm amazed at how much information there is available about natural solutions to my hand care problems, and I have found suppliers and recipes for just about everything I need to make my own.  I am allergic to perfumed products, and also to a lot of the preservatives and other artificial additives cosmetic companies use in so many of their products.  It's hard to avoid some of them with my manicures, of course, but at least I can with the products I use every day on my skin and nails.

As I used 2 ulta3 polishes this week, I thought I'd mention the fantastic Christmas gift ideas they have available here in Australia this year.  My hubby bought me a wonderful ulta3 Advent Calendar full of mini nail polishes, and so far the colours have been amazing, and I haven't got any of the ones that I've opened the window for, so hopefully I won't have any of them.  There is also a cube of 18 full-size ulta3 polishes, and a large candy cane full of full-size polishes. I think they have a couple of other gift items, too, but I haven't discovered them yet.  Of course, I've put my order in to Santa for one (or more, perhaps) of them for Christmas.  There are some great Colours by TBN gift sets as well, and lots of others around the stores for other brands, so I'm hoping Santa gets the message and is feeling generous.

So, that's it for another week.  I hope you like what I've shared with you this week, and that you'll come back often to see what I've been up to.

God bless you, and peace be with you all!  Have a wonderful day!

Hugs

Christine

(Please check out my other blog below, too.)

Words of Life and Hope

P.S. I have received no monetary or material gain from my reviews of the products used for this manicure.
Everything comes from my personal stash, all purchased by me, either in-store or online.