Showing posts with label care. Show all posts

Sunday, July 12, 2015

Amazing Blue Grace-full Nail Polish Manicure and Nail Care Update - 10 July 2015

Firstly, I'd like to show you just how much my nails have improved since my last update regarding the damage to them experienced because of my accident with some nail glue.

 
Back on 9th May 2015

 
As they are today.

As you can see, they have grown quite a bit, and I haven't had a break at all since I started using Pretty Serious "Rock On Strengthener" on them at all times.  Even without it, after I have removed my previous manicure, they definitely feel quite a bit stronger.  As you can imagine, I am VERY happy about that.

Now, on to this week's manicure.  Please forgive the polish left on my cuticles and fingers, but I stuffed up the middle finger on my left hand when I was cleaning up and had to photograph my right hand nails, and I am right-handed, so cleaning them is a lot harder for me and I still haven't mastered it.  They actually look pretty good in real life, but my camera picks up every little error or flaw.  I'll get there eventually - as the saying goes "practice makes perfect", and because of the nine weeks that I was unable to do my nails I lost some of my newly-learned skill (SIGH)!

Today I am showing you two amazing polishes from Grace-full Nail Polish that have been crying out to me to be used together ever since I bought them.  It is a lot simpler than my past few manicures, but I really wanted these two to stand out on their own because they are so absolutely AWESOME!  I've never worn dark blue before, and now I don't know why, because it looks fantastic with my skin colour.  You can be sure that I will be buying more colours like this in the future.

 Outside in Shade

The two Grace-full polishes I used for this manicure are "Mandy" and "Eboni".  Neither of them are still available, unfortunately, but you may be able to get some from a friend or through a stash purchase if you are lucky.  Also, Theresa may even make some more like these again in the future.  I certainly hope so because I have completely fallen in love with both these polishes and this colour.

I started my manicure, as usual, with one coat of Pretty Serious "Rock On Strengthener" on all my nails.  Once that was completely dry I added one coat of Grace-full Nail Polish Base Coat to all nails.

Next I painted three thin coats of "Mandy" to all my nails except for my middle nails, on which I only applied one coat of "Mandy".  Then I painted two coats of "Eboni" on my middle nails, and added a little bit of dabbing to make sure I got some of the stars on each nail.  I didn't have to fish very hard because the polish is really loaded with all the glitter included in it.

"Mandy" is a deep blue that has purple undertones, lighter blue micro flakies and blue fantasy flakies that create the most wonderful colour effect.  I haven't been able to stop looking at it since I put it on because it is so beautiful.  It went on a little patchy at first, but I had good coverage with two coats.  I only added the extra coat so that I could get the full effect of the polish in my swatch photos.  The finish is slightly matte and a little rough, but just one coat of top coat was enough to smooth it out and really make it shine.

"Eboni" is a dark purple galaxy jelly with holographic silver stars, violet hexagonal and square glitter, and rainbow iridescent glitter.  It went on really well, and two coats and a little dabbing to make sure I got some stars on each nail gave me just the amount of jelly effect I wanted.  I used a layer of "Mandy" underneath it because I wanted to give it a more blue effect, and it worked really well.  The finish was quite rough because of the larger glitter and stars, so I had to use two coats of top coat to smooth it out, but that is quite normal for larger glitter anyway, so it was not a problem.  

I finished my mani with one coat of Grace-full Nail Polish Quick Dry Top Coat on all nails, and an extra coat on my middle nails.  The finish is so smooth, and has a beautiful shine.  This really is a lovely top coat which I definitely recommend.

The overall effect of these two polishes together just blew me away.  It doesn't matter what kind of light I'm in, they shine, shimmer and sparkle like sapphires, and my middle nails look as if I've deliberately done a galaxy nail art design, and are just gorgeous.  Once again Theresa from Grace-full Nail Polish has come up with two superb polishes, and I just can't get enough of her products.  I wait with baited breath every time she is working on a new collection or special edition polish, and I know that there will always be so many of them that I want from the collection that I won't be able to afford them.  It's times like this when I wish I was still working.  So, please check out her site and you'll see why I'm addicted to this wonderful Aussie Indie polish brand.  Here are some more photos in different light situations that will show you just how gorgeous these polishes are and why I just had to use them together.  I even managed a macro of "Eboni", which really shows its beauty, but please ignore my horrible clean-up job.  I will get better, I promise!


On another note, I am going through some pretty tough health problems at the moment which my doctor thinks are a result of the combination of my chemotherapy last year and the massive doses of antibiotics I had going through three drips in my arm when I got double pneumonia after my second dose of chemo.  I had shocking diarrhea from the chemo, but it got a whole lot worse while I was on the antibiotics, and even after I left hospital, I was still on very strong antibiotics for over a month.  I was already suffering from lactose intolerance, and thought I had this pretty much under control, but over the last few months I've been having problems with just about every meal I ate.  It appears that I now have IBS (Irritable Bowel Syndrome), and I've been to see a dietician, who has put me on the FODMAP Free Diet developed by Monash University in Melbourne, Australia (see http://www.med.monash.edu/cecs/gastro/fodmap/), who are doing intensive research into this particular problem.  I've only been on it for 3 weeks so far, but already I'm starting to work out that the foods that are big no-no's with this diet have been causing all my gut problems, and some of them very badly.  

This diet has very extensive food restrictions, and I'm finding it very hard to come to grips with, but if it works I don't care.  My brain is in meltdown from researching recipes and information on IBS and this diet, and from having to read all the labels on food packaging to make sure that none of the restricted foods are in the products.  One of the hardest things I've found is the fact that I can no longer eat garlic or onion, because I used to use this in just about everything I cooked.  However, I'm learning how to use herbs and spices, and other hints and tips I've found, to provide flavour to my recipes.  

If you suffer from IBS, I really recommend that you check this site out (http://www.med.monash.edu/cecs/gastro/fodmap/), and download the app as well.  I have found the app is amazing for when I'm shopping, because it enables me to check just what I have to look out for on labels, and also what I can and cannot eat if I'm not sure.  It has a shopping guide, too, and you can even make up a shopping list with it.  There is a lot of information on each of the foods you may be having problems with so that you understand why it is happening.  The diet is only meant to be short-term initially (6 weeks to 2 months), and if your stomach has settled down by then you can start trying to introduce the different foods to see just which ones are causing you trouble.  From what I've experienced so far, they all are, but I'm hoping that, once my gut has recovered, I will find that I can still eat some of them after all.

Well, that's all from me today, and thanks for visiting. I would love to hear what you think if you would like to leave your comments, and I hope you will come back often to see what I have to share with you.

Have a wonderful week, and may God bless you!

Hugs

Christine

(Please check out my other blog below, too.)


I was not paid in any way, shape or form for any of the products mentioned in my blog.
All products were bought by myself and my comments are honestly and freely given.

Wednesday, June 24, 2015

Green Skittlette Manicure - 23 June 2015

Finally I've managed to get my manicure for this week done, and it is a green skittlette, featuring two of the polishes I got in the Lyme Disease Awareness Giveaway Prize and another beautiful green polish.  I can't stop looking at my manicure, even though I thought I would never wear green nail polish, because it's never been one of my favourite colours.  Needless to say, I've changed my mind.  Then again, with these three beautiful polishes to use, I think it shouldn't have come as a surprise to me.


The polishes I used are Pretty Serious "VT100", Grace-full Nail Polish "Lyme for a Cure" and Emily de Molly "You're Not That Great".  "Lyme for a Cure" is the Limited Edition polish made only for the Lyme Disease Awareness Giveaway" last month, and "You're Not That Great" was also in the prize package. If you haven't already seen my post about this prize that I won, you can check it out below.  I also used Pretty Serious "Rock On Strengthener" and Grace-full Nail Polish "Quick Dry Top Coat".

Taken in the shade in my sunroom.

I started with one coat of Pretty Serious "Rock On Strengthener" on all my nails, then another coat on a couple that are still very fragile to give them a bit of extra protection.  Then, would you believe I forgot to put on my base coat?  I couldn't believe it myself, but there you go.  It will be interesting to see how "Rock On" performs as a base coat on its own.  I'll let you know when I do my next manicure.

Next I painted my pinkie and my thumb nails with two coats of Pretty Serious "VT 100", which is a beautiful deep-green shimmer polish with micro silver and green glitter, which unfortunately is no longer available.  The polish went on really smoothly, and is almost a one-coat polish, but I used two coats for my manicure.  The colour is gorgeous, and there is an amazing amount of glitter, which unfortunately was very hard to catch in some of my photos, but here is a macro photo of it that will give you some idea of how lovely it is.

Taken in overcast conditions outside.

Then I painted my index and ring fingers with Grace-full Nail Polish "Lyme for a Cure".  This polish is just beautiful to use, and coverage was fantastic with two coats.  I'm so glad I won this prize, because this polish isn't available to others, and the colour is so gorgeous and rich, with so many colours flashing through it I couldn't name them all.  It's a beautiful green holo, but unfortunately I was unable to catch its true beauty with my camera.  Here is a macro of it, however, which does show some of the colour shift.


Beautiful, isn't it?  This is one of the polishes that has completely changed my opinion of using green polish on my nails.  I can assure you, I will be using lots more in the future.

The polish I used on my middle nails is Emily de Molly "You're Not That Great", which is a lime green crelly, loaded with holographic lime and turquoise glitter, and blue shimmer.  I used three coats because I wanted to get the jelly effect, and the effect is amazing.  I don't know why it is called "You're No That Great" because it certainly is great!  I found it shifted almost to turquoise on my nails, but still had enough green in it to look great with the other two polishes.  Here is a macro shot of it for you to drool over.  


This polish is still available, so pop on over to Emily de Molly for a look at some more great photos.

I finished my manicure with one coat of Grace-full Nail Polish "Quick Dry Top Coat".  This is the first time I've used this top coat, and I'm very impressed with it.  There was no bubbling on any of the polishes, unlike with the OPI "Natural Nail Top Coat" I used for my last manicure.  The finish is lovely and glossy, and it flowed on beautifully.  I can really recommend it, so pop on over to Grace-full to check it out now.

Now, here are some more photos of my complete manicure, which will show you why I'm so pleased with the result.

  
These photos were taken in the sun on my front porch.


Taken in the shade in my sunroom.

  
Taken inside under artificial light.


Taken in overcast conditions outside.

Well, that's my manicure for yesterday.  I'm really pleased with all the polishes I used, and just love the final result of the combination of these three polishes.  I hope you agree, and I would really appreciate any comments you might have.

Thanks for visiting, and I hope you'll come back often to see what I have to share with you.   You can follow me by filling in the boxes at the top right-hand side of the page if you so wish.
 
Have a wonderful day, and may God bless you!
Hugs

Christine
(Please check out my other blog below, too.)
Words of Life and Hope
 
I was not paid in any way, shape or form for using any of the items mentioned in this post,
and my honest opinions are given freely and without any bias at all.

Sunday, June 14, 2015

Brown And Copper Skittle Manicure - 14 June 2015

Finally, after over a week of major ups and bigger downs in our home and in our lives, here is my latest skittle manicure.  I used five different brown and/or copper colours, and I am amazed at how well they went together.  Here are the products I used:


Now to some photos of my manicure, taken in artificial light at BigW and outside, but with light cloud cover, and just a touch of sunshine.

  
                      Under Artificial Light at BigW                                   Outside In Shade

Outside Under Light Cloud

I started with one coat of Pretty Serious "Rock On" Strengthener on all my nails, and a second coat on a couple that are still very thin and fragile.  Then I put one coat of OPI Natural Nail Base Coat on them all.

On my pinky fingers I used Model's Prefer "Double Shot" creme polish, which looks like a really dark brown in the bottle, but with two coats on my pinky nails it looks black, so I was a bit disappointed, because I wanted it to be brown to fit with the rest of the colours I used. However, it was very easy to work with, and I had excellent coverage with two coats.

On my ring fingers I used Grace-full Nail Polish "And My Axe", which is a dark red-brown jelly packed with holo, silver, gold, copper and bronze glitter.  In real life, just looking at it on my hands, I seemed to have full coverage with just two coats but, thanks to my hubby buying me a smart phone with such good photographic ability, I realise now that I should have added another coat, and perhaps done a bit of dabbing.  Like all my Grace-full Nail Polish, it looks amazing under any lighting, but especially under artificial light and in the sun.  Unfortunately it was cloudy yesterday, so it was very hard to get any photos in full sunlight.  That's the problem with living in Tasmania in winter.  Unfortunately this polish is no longer available, but there are heaps of other wonderful polishes available.

On my middle fingers I used Pretty Serious Cosmetics "Seasonal Sunset", a rusty, jelly-base colour packed with gold and copper glitter. In real life it is a real glitter bomb, and it was so hard to get a a photo that did it justice.  It goes on like a dream, and I only needed two coats to get fantastic coverage.  I probably could have had enough cover with just one good coat, but I wanted it to look good for the swatch, so I gave it the extra coat. This polish is also no longer available, and was a gift from a dear friend who knew that I wanted a bottle of it and that I hadn't known about Pretty Serious Cosmetics when this colour was available.  Thank you, Therese.  I absolutely love it!

On my index fingers I used Shades of Phoenix "Fred's Courage" from the Shades of Potter Collection, which is a burnt orange, autumn-leaf coloured polish.  It went on really smoothly, with full cover in two coats, but when I put the top coat on it bubbled, and got worse overnight.  I was so disappointed, because the colour is amazing, and I was so looking forward to using it.  I will definitely use it again with a different top coat.  The Shades of Potter Collection is wonderful, and I can't wait to try the other colours in the collection.

Finally, on my thumbs I used one of the new Ulta3 Autumn/Winter Metallic Collection polishes, "from the mine", which is a gorgeous copper, metallic glitter bomb with a textured finish.  I also added just one coat of this polish to my pinky fingers to try and take some of the starkness off the colour on them. I don't normally like rough finishes, but with just one coat of top coat this was not so rough that it catches on things, and I love it. All this collection is beautiful, and I just had to give this one a try.  If you haven't tried these polishes yet, get to your nearest Terry White Pharmacy and find them as soon as you can.  There are five in the set, and every single one of them is just gorgeous. 

I finished off with one coat of OPI Natural Nail Top Coat, which gave everything a lovely glossy finish.  However, as I mentioned earlier, it made the polish on my index fingers bubble, but not any of the other polishes.

So, there you have it for this post.  I'm really pleased with how the colour combination worked out and my nails are growing once again, although they still have a long way to go, thanks to both the Pretty Serious Nail Care treatments I am using, "Rock On Nail Strengthener" and "Cuticle Hero Super Hydrating Cuticle Oil".  They are really great, and I'm so glad that I discovered them, and was blessed with some items from this range by a lovely friend of mine.  Thanks, Chris, you know who you are.

I'll be back again soon to show you my birthday present stash from my hubby, and a couple of other great finds.  Thanks for visiting, and I hope you'll come back soon to see what I have to share with you.

Have a great week, and God bless you!

Hugs

Christine

(Please check out my other blog below, too.)

Words of Life and Hope
http://wordsoflifeandhope.blogspot.com.au/
burnt orange Autumn leaf coloured polish.

Saturday, May 9, 2015

Update On My Nails and Latest Arcane Lacquer Purchase 9 May 2015

Today I have an update on how my nails are recovering from the disaster I had with some nail glue and acetone nearly 2 months ago (see earlier post for more information), and also some photos of my latest purchase from Arcane Lacquer.

Firstly, here is a photo of my nails as they are today. Please excuse my ugly hands, which are partly the result of age, but also from losing a lot of weight over the last couple of years, and of course there is no way to get rid of the excess skin.  If anyone knows of a way of improving them I'd be very grateful for your advice, because I hate looking at them as they are now.  I slather them in hand cream throughout the day but, although they feel nice and soft, they look horribly wrinkly and OLD!


As you can see, my nails are coming along pretty well.  The nails on my right thumb and left pinky are only just growing past the nail base, as are the nails on both of my middle fingers.  Also, many of them are still lifted off the nail bed, the most obvious of which are my two index fingers, but I'm hoping that they will recover as they get stronger and healthier.  Most of the horrible brown, flaking tips caused by my chemotherapy last year are finally growing out, and the nails behind them are a lovely, healthy pink. My cuticles are looking so much better, and so are my nails, so I'm starting to feel a lot better about the way things are going. 

So, if I can keep them safe for another week or two, it looks like I might be able to start painting them again very soon.  I'm waiting for a new strengthener I ordered to arrive (Australia Post up to its usual standard), and this one is supposed to actually strengthen them immediately as well as treating them, so it should be amazing.  More on that when it arrives and I've given it a try.  In the meantime, I'm using Sally Hansen Miracle Cure on them every other day, and continuing to use my Jojoba Oil, Revitanail Keratin Strengthening Serum and Nourishing Oil, and Revitanail Hand & Nail Cream throughout the day, especially after washing my hands.

I have so many new nail polishes in my stash that I am dying to try out, including the two beautiful Arcane Lacquer polishes below.  This are another Indie Polish brand that I am very quickly becoming addicted to.

https://www.etsy.com/au/shop/ArcaneLacquer?ref=l2-shopheader-name 

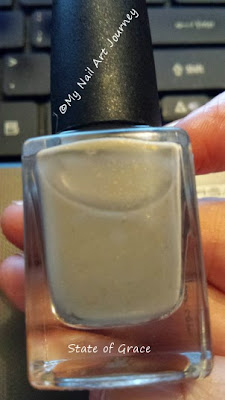
The one on the left is "Glorious Nightmare" and the one on the right is "State of Grace".  It was soooooo hard to get the true effect of these polishes, although the "Glorious Nightmare" photo is pretty close to the mark.  I have two close-ups of them below, and the one of "State Of Grace" shows some of the shimmer and micro-glitter which you can't see in the photo above, but the actual colour is a bit darker. 

https://www.etsy.com/au/listing/204282672/glorious-nightmare-halloween-duo-arcane?ref=shop_home_active_21   https://www.etsy.com/au/listing/177259044/state-of-grace-soft-pulses-collection?ref=shop_home_feat_2

"State of Grace" is described as a mushroom/taupe creme with a strong gold shimmer and flecks of orange and green, along with gold flakies, although I would describe it as grey. You really have to see this in real life to appreciate its true beauty. "Glorious Nightmare" is described as a deep purple jelly with berry pink, lemon and purple micro glitters. They both are absolutely beautiful, and I can't wait to try them out, which I'll be able to do very soon, God willing.

That's all I have for you today, but I hope to have more very soon when some of my purchases that I'm waiting on arrive.  I hope you will come back often to see what I have to show you, and you can follow me if you wish to by going to the top right-hand side of my page.

Have a wonderful Mother's Day tomorrow, and may God bless you.  For anyone going through treatment for breast cancer, my prayers are with you, and I hope that you come out the other end OK.  My mantra now is "I'M A BREAST CANCER SURVIVOR, AND STAYING ONE".  I actually found a badge with that written on it online, and I'm going to start wearing it everywhere.

Hugs

Christine

I was not paid in any way, shape or form for showing you these polishes.
 I bought them with my own money,
and my opinions are given freely and without bias.

Friday, April 10, 2015

Nail Recovery Update, BUT New Damage! 10 April 2015

Hi, everyone! I hope you had a great Easter and got lots of rest, and hopefully got time to do lots of nail art.

I thought I'd better touch base and give you an update on how my nails are recovering after the disaster I told you about in my last blog two weeks ago, and also let you know what happened yesterday - another disaster!

Here are some photos of my damaged nails from 2 weeks ago and how they're recovering.


As you can see, the two badly damaged nails on the left hand are starting to recover nicely, and so is the thumb on my right hand.  I have been using an intensive recovery regime on all my nails and my hands since all the damage was done, and it is very encouraging to see that it appears to be working.  For the first week I used pure Jojoba Oil, Revitanail Nourishing Oil, Revitanail Keratin Strengthening Serum and Revitanail Hand & Nail Cream. 

After a week, once my nails had stopped hurting so much, I started on the Revitanail Nail Strengthener program, which involves 2 coats on the first day, 1 coat each day for the next 5 days, removing it on the 7th day, and then repeating this for 3 more weeks.  The whole program takes 28 days, and then you can leave it off for a week or two, and repeat the 28 day program again until you are happy with the strength of your nails.  You can't use nail polish over the treatment, so I'm afraid my nails are totally nude all the time at the moment.

As well as the Nail Strengthener, I have continued to use pure Jojoba Oil, Revitanail Nourishing Oil, Revitanail Keratin Strengthening Serum and Revitanail Hand & Nail Cream as often as I can, and will continue to do so in the future, particularly as it really does appear to be working so well. My husband keeps looking at me and saying "Are you still rubbing your nails?", and I just say to him "Again, darl, again!". Nearly every 30 minutes finds me rubbing one treatment or another into my hands and/or nails.  In fact, I find myself massaging my cuticles even when I'm just sitting reading because it has become such a habit. Some of the skin on my fingers has started to peel off, too, caused by the burning from the acetone I used trying to get the nail glue off my nails and fingers. The tips of some of my fingers are still very tender and quite sore, so I'm having to be really careful what I do each day so no more damage is done.

So, that's the good news!  Now to the disaster last night. When I took the nail strengthener treatment off last night, I discovered that I actually had two more nails that were broken right down below the quick, and I felt physically sick.  I couldn't believe it, even though I had suspected for the last couple of days that one of them may be broken.  So, they have now been filed right back as far as I could, and I also filed back my unbroken nails so that they don't look ridiculous.  The broken nails are really sore, too, because of how far down I had to file them. Here is a photo of my right hand showing the damage, and also how some of my nails have lifted off the nail bed due to the damage done from my chemotherapy treatment last year. Most of the nails that have broken have suffered this damage, and that is why they have broken so far down my nails.


Now it's back to the drawing board, and onward and upward, I hope! I'm heartbroken that all this has happened just when my nails were starting to grow, and had started to look quite good when polished.  I didn't get to do an Easter design, which I was really looking forward to doing, and it doesn't look like I'll be doing one for Mother's Day next month, or perhaps even for my birthday in June.  Getting my nails in good, strong condition is more important at this stage, so that is what I am endeavouring to do.

I will be back in a couple of days to show you some of my new polishes that I have been receiving in the mail.  Retail therapy is great when you're feeling miserable, and many of the Indie Polish makers have had sales and special offers on over Easter, so I've been busy checking them all out.  It helps to keep my mind off things, too, which is good.  I only wish I had more money to spend, because, after all, a girl can NEVER have too much polish, can she?

Thanks for visiting, and I hope you have a wonderful weekend, and for those in Tasmania, make sure you keep warm.  It's going to be a wet, chilly couple of days. Please come back soon to see what I have to share with you, and please let others know about my site if you have enjoyed your visit.

Hugs

Christine

(Please check out my other blog below, too.)

Words of Life and Hope
http://wordsoflifeandhope.blogspot.com.au/

Tuesday, March 24, 2015

My First Water Marble Manicure - 24 March 2015

Yesterday I did my first water marble manicure, and I'm pretty pleased with the way it turned out. 


Picture on left was taken inside under artificial light, and the one on the right was taken in the shade.
 
Please forgive the rough skin around my finger tips and cuticles, but my nails have had a pretty tough time over the last few days.  My index finger and my middle finger on my left hand, and my thumb on my right hand, all have patches on them.  They broke half-way down my nails - they have all pulled away from the nail bed down the side of the nails because of the chemotherapy damage, and they are still very thin and fragile there.  I still don't know whether this damage will be permanent, or if they will grow back onto the nail bed as the new nail growth comes through.  Only time will tell!  I went out today and bought some Revitanail "Strengthener", "Keratin Strengthening Serum", Nourishing Oil" and "Hand & Nail Cream".  They are on special at Terry White's Pharmacies, 3 items for the price of 2, this week (in Australia), and I'm going to start using them all as often as possible.  I'm afraid I haven't been following my own advice lately because I've been so busy, and have also been feeling really depressed and not at all motivated, so I have to start practicing what I preach again and try to get things back on track.

Now, on to my water marble manicure.  I started with 2 coats of Sally Hansen "Hard As Nails" strengthener because all my nails are so fragile, and I'm hoping this will help to keep them from breaking.  I got 6 bottles of it REALLY cheap before Christmas on eBay, but forgot I had it.  When my nails broke (after I'd stopped crying - literally), I started thinking about what strengthening base coats I had that I could use, and I remembered I had this.  So, God willing, I won't have any more breaks for a while.

I then added two coats of OPI "Alpine Snow" white cream polish to all my nails. I don't really like this polish because I need three coats to get a smooth finish, but because I was actually planning to do a plastic wrap marble manicure (tutorial here http://polishandpearls.com/watercolor-nails/ and elsewhere online), I just left it at two coats.  However, I couldn't get this manicure style to work with the polishes I wanted to use, so I decided to try an actual water marble instead (tutorial here http://www.beautybay.com/EssentialBeauty/Articles/watermarblenailstutorial and in many other places online). 

I then smeared Vaseline around all my nails and part-way up my fingers to make cleaning up a lot easier, because water marbling is very messy.  I had to be careful not to get any of the Vaseline on the actual nails, because it would have stopped the nail polish from going onto the nails.

Next, I filled my bowl with tepid water straight from the tap, and added drops of OPI "Alpine Snow" (white), Face of Australia Pastels "Boys 'N' Berries" (blue), OPI "Mod About You" (pale pink) and OPI "Planks A Lot" (lilac) (in this order).  I did this three times for each design (twelve drops in all), and then used a toothpick to make my design, following the above tutorial as a guide.  All the polishes spread over the water really well, which was great. I used a small glass bowl because I wanted to do all my nails at the same time, instead of individually or in pairs, which is the usual way it is done, because I was so frustrated that the other design hadn't worked and wanted to get it over and done with.  My design was a random one, instead of any particular design, in which I just swirled the colours around and through each other until I was happy with the distribution of the colours.  Then I just dipped all five fingers of my left hand in the bowl at once, and repeated all this with the other hand.

I finished off my manicure with one coat of Revlon "Quick Dry Top Coat", which gave me a beautiful, glossy finish. I am rather pleased with the end result, and really love the way the colour combination worked out.  Of course, I still have a lot to learn about this technique, but with all the advice and tutorials available on YouTube, and numerous blogs and websites online, I should be able to have a lot of fun trying out new designs, and a multitude of colour combinations, in the future.  It really is quite easy to do, I found, and the mess was easy to clean up because I had used the Vaseline around my nails and fingers.  Next time I'm going to try using sticky tape around my nails and fingers, and see how that goes.

Thank you so much for visiting, and I hope you'll come back often to see what I have to share with you.  If you so wish, you can follow me by filling in one of the boxes at the top right-hand side of the page, and I'd love you to share it with your nail-art friends.  Now I'm off to put some cuticle oil on my cuticles and lots of hand-cream on my hands.  I couldn't believe how dry they were until I took the  photos.  My new phone has a really good camera, and it's picking up flaws in my manicures, and every little bit of damage to my nails, cuticles and hands, which don't show up when you just look at them day to day.  So, I've got lots of work to do to repair all the damage, as if I didn't have enough problems with my nails already.  Oh, well, that's my own fault, I guess, for letting things slide.

Have a wonderful day, and may God bless you!

Hugs

Christine

(Please check out my other blog below, too.)

Words of Life and Hope
http://wordsoflifeandhope.blogspot.com.au/

Wednesday, March 11, 2015

Caring For Your Nails Before, During and After Chemotherapy

I have just realised that, despite the main aim of my blog being to help others who are going through chemotherapy, I haven't put my nail care advice guide, that I wrote just before I started my blog, on the site.  Silly me!!!!!  So, here it is, and I hope it can help keep someone going through chemotherapy from experiencing what I went through with my nails.  Firstly, I'd like to show you the damage done to my nails by the chemotherapy.


Caring For Your Nails Before, During and After Chemotherapy

Before I started chemotherapy for breast cancer, I was told by my oncologist, and the breast-care nurse, to paint my nails with dark nail polish to protect my nails from the sun's UV rays, and to hide any damage that might occur.  Despite using nail polish, my nails were still horribly damaged - they went a horrible brown colour, started to flake and peel, and even started to come away from the nail bed.  I went searching for information to help me repair my nails, and also ways to care for them once they were looking good again.  No one told me any of this information before I started chemotherapy, but if they had, I possibly may not have had any of the problems with my nails that I did.

So, I decided I wanted to try to help prevent all the beautiful women (and men) going through chemotherapy from going through the same experience I did.  Here are some things I WAS NOT TOLD that you really need to know BEFORE you start chemotherapy.

1.  Prevention is better than a cure, of course, so be prepared and start early. As soon as you know that you are going to have chemotherapy, start using the nail and hand routine below, and do it every day without fail.  Hopefully, this may stop you from getting the severe damage I did.  I can't promise it will prevent all the damage, but it should help a lot, and should definitely help to keep your nails from drying out.

2.  Buy yourself the best CUTICLE OIL/NOURISHING SERUM you can afford.  Revitanail and Sally Hansen make some really great ones that nourish, strengthen and protect your nails, but there are other brands out there too.  They are readily available from pharmacies, department stores, beauty shops, Priceline stores and, of course, online.
     
     I have recently discovered that PURE JOJOBA OIL is the best thing you can use on your hands and nails, so I am using that now, too.  It is available at health food shops, Priceline and Chemist Warehouse, but it is a lot less expensive online, and there are many companies that sell it.  Check out eBay, or just Google it and you will be amazed by the other uses it has, too.  It's also odourless.  AMAZING STUFF!!!  

    I would suggest you use both the cuticle oil and Jojoba Oil to give you even more protection from damage.  Massage one of them into you nails and cuticles every time you wash your hands if you can, but at least twice a day, morning and night.

3.  ALWAYS use a GOOD QUALITY BASE COAT on your nails before applying your nail polish, because today's nail polishes are made to adhere to the base coat, not your nails.  It will help stop your nails from being stained by the nail polishes you use, too.  You can also get strengthening and nourishing base coats - even more protection and nourishment for your nails.  Availability is the same as for the cuticle oils. 

4.  Apply as many coats of nail polish as you need to get the coverage on your nail you want, waiting for each coat to dry before applying the next coat.  Usually two coats are enough, but some polishes require three.  Apply thin coats, because the thicker the coat the longer it will take to dry.  They are available from the same places as mentioned above.

5.  If you want your nail polish to last more than just a few days, you should use a good quality TOP COAT to stop it from chipping and getting damaged.  There are some great top coats available, from the companies I have already mentioned, and of course from the same places.  Reapply your top coat every other day to make your polish last longer.

6.  Finish off by applying a good quality HAND AND NAIL CREAM.  Massage a generous amount into your hands and nails at least twice a day, but more often if you are washing your hands a lot, because washing dries out both your hands and nails.

7.  Always try to use gloves when you are washing the dishes, gardening or cleaning around the house, because they, too, will help to prevent your nails from getting damaged.

8.  Always use an ACETONE-FREE POLISH REMOVER, because acetone dries your nails out, and is very harsh on your cuticles.  There are some great conditioning ones for different skin types. They are available from the same places as the other nail care products.

9.  Every time you remove your nail polish, massage your cuticle oil/nourishing serum into your nails and cuticles several times, over a couple of hours, before applying your next nail polish.  This gives the oil/serum a better chance of getting right into your nails and cuticles, and will really make a difference to how strong and healthy they are.

10. Don't use a metal nail file or emery board on your nails, because they will only cause even more damage.  Buy a good quality Czech crystal/glass nail file , which is a lot finer and so much kinder to your nails.  Manicare sell a great one which I use.  Don't be tempted to buy a cheap Chinese one, because the quality is inferior and could cause damage.

11. There are ECO-FRIENDLY VERSIONS available for all the products mentioned above if you are concerned about the environment or have allergies.  These are usually advertised as being 3-free or 5-free, which means they don't contain the nasty chemicals most of the other polishes do.  Just Google for more information and where to purchase them.

12. Lastly, one of the most important reasons for putting nail polish on your nails is that it not only helps to protect your nails, but THEY WILL LOOK GREAT, too, and that will make you feel better about yourself, and that has to be a good thing.  When you see the range of nail polish and nail art products available, even scented ones, you will be amazed at how attractive you can make them, it will really lift your spirits, and may even help to take your mind off what you are going through, which is what happened with me.

If this information helps to keep just one person from getting the damage chemotherapy did to my nails I will be happy.  Seeing my nails the way they were was so depressing, and that was the last thing I needed, and the last thing YOU will need while you are going through your chemotherapy treatment, and afterwards, during your recovery period.  If you already have damage, it's never too late to start looking after them.  It really is worth the effort.

Here's a photo taken on 25th February 2015, less than five months after the last photo was taken, showing the improvement which following the above regime has made to my nails and cuticles.  There is still some damage, for example the lifting from the nail bed, but I'm hoping that will improve with time, God willing.  Most of this improvement has come since starting to use the pure Jojoba Oil mentioned earlier.  Please do give this amazing essential oil a try.  It's an absolute miracle worker, and makes your hands and nails feel great, too.


I would like to wish you all the best for your journey through your cancer treatment, and hope that you reach the other end with a good outcome.  Look good and you'll feel better!

© Christine Chipman 2014

Saturday, November 29, 2014

Headwear and Gifts for Cancer Patients

I have just received an email from the most wonderful site for cancer patients online.  They have just upgraded their site, and they have every type of headwear you could wish for if you have experienced hair loss during and after chemotherapy, or you may know someone who has. Beautiful hats, scarves, turbans, wigs and accessories, and also beauty products and fabulous gift items to help you or your loved one look good and feel better. Or you can show your support for someone you know who has cancer, and is experiencing hair loss from their cancer treatment, by purchasing one of these wonderful items for them, or even for yourself.

The name of the site is Headcovers Unlimited, and you can find them at http://www.headcovers.com/.

If you are about to go through chemotherapy, or have been through it and have lost your hair, and you want something to make you feel better about yourself whilst going through this horrible trial, please check them out.  I purchased several items from them while I was going through chemo, and five months later I'm still wearing them because my hair still hasn't grown very much.  It's coming, but I've been advised to keep it really short for a while, to strengthen it and hopefully thicken it, too.

Or, maybe you're looking for a gift for someone you know who is going through chemotherapy, or is about to.  There are some wonderful gift items and beauty products on the site, and you could even buy them a scarf, hat, turban or even a wig.  All these things would make your loved ones feel a whole lot better.  Take it from someone who has been there, done that.  I was particularly taken with the beautiful Cancer Awareness jewellery, keyrings and magnets they have in their gift section.  There are some absolutely wonderful items here, and they would make fantastic Christmas presents for the people you care about who are suffering from one of these dreadful diseases.  Cancer is horrible, and so are the treatments for it, but you can help to make it a little easier for them, and brighten their lives, by purchasing one of these beautiful items for them.

Of course, there are others who would love these items as well.  People suffering from alopecia, trichotillomania and other medical hair loss conditions would also appreciate any of these products.  Or perhaps you want to wear one of the gift items to show your support for the people sufffering from all the different types of cancer.  Everyone is catered for here, so I know you will be able to find something you like.

Please, check the site out now.  You will be amazed at the quality of their products, and the range of items available.  Here's the link again.  http://www.headcovers.com/

God bless you, and have a wonderful day!

Hugs

Christine

(Please check out my other blog below, too.)

Words of Life and Hope
http://wordsoflifeandhope.blogspot.com.au/

P.S.  I have received no incentive in any way, shape or form to promote this site.
I am just speaking from my own experience, not for any gain.